
Chameleon Cloud Tutorial
National Science Foundation
Program Solicitation # NSF 13-602
CISE Research Infrastructure: Mid-Scale Infrastructure - NSFCloud (CRI: NSFCloud)
Dockers and Micro services - Kubernetes Intro
Objectives
In this tutorial, you will be walked through the basic installation of Kubernetes on the currently available CentOS images provided by Chameleon. Following installation, the guide will continue on to explain the basics and advanced usage of Kubernetes.
| # | Action | Detail | Time (min) |
|---|---|---|---|
| 1 | Setting Up Kubernetes | To begin, users will be shown the steps necessary to install Kubernetes on a Chameleon Bare Metal Server. | 5 |
| 2 | Simple Uses of Kubernetes | Here, users will be demonstrated the several differnt uses of Kubernetes ranging from simple deployments to creating Services to run a webservice. | 5 |
| 2 | Using Setup Files With Kubernetes | Finally, we will demonstrate how to create files that will setup an application for us to build up and tear down at will. | 5 |
Prerequisites
The following prerequisites are expected for successful completion of this tutorial:
-
A Chameleon user account
-
An active project in the Chameleon Dashboard with appropriate administrative permissions.
-
Two active instances accesible by one another through a network connection.
Step 1: Setting Up Kubernetes
Kubernetes is a system used to control a wide number of hosts for the purpose of deploying and managin containerized applications. In our specific setup, we will be using Kubernetes in association with Docker to serve as our application container system. The fundamental idea behind Kubernetes, beyond the setup stage, is that, as the user, there is no need to know about which host an application is running on. This serves the purpose of requiring the user to only need to focus on the application and not have to worry about the specifics of the host or management.
The setup of Kubernetes relies on a single host serving as a Master that will serve as the primary controller that will manage the Kubernetes installation. Any additional hosts that are to be used for application deployment are defined as a Node (previously described as a Minion in prior documentation). For the tutorial, the design will be to assign one single instance as the Master and the second as the Node.
NOTE: At the time of this writing, Kubernetes is currently in a beta state. This means that the design is constantly evolving and subject to change, possibly invalidating parts of this tutorial, though the general idea should remain the same throughout. To keep up to date with the latest on Kubernetes, please visit their current development site.
For our purposes, this tutorial will begin with the installation of Kubernetes.
First, we need to visit the list of instances and find the two instances we wish to use for our installation.
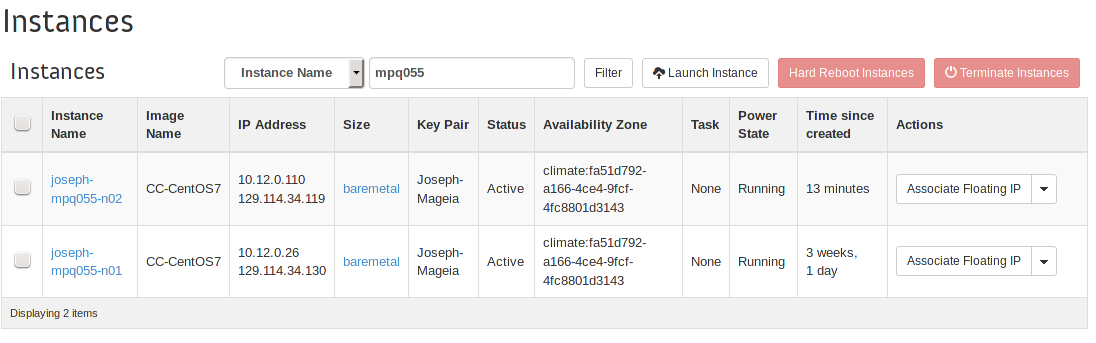
Take note of the local area network ip addresses of each instance and decide which host will be the Master and which will be the Node. In this scenario, 10.12.0.26, will be appointed as the Master. 10.12.0.110 will be the Node.
Go ahead and connect to the Master instance to begin installation. Please note that the machines are being connected to through SSH using appropriate aliases as defined in ~/.ssh/config.
[bill@windows] ssh cloud
Once logged in, we need to install Kubernetes and etcd so that the instance may act as the Master. Using the yum package manager, install both packages.
[cc@joseph-mpq055-n01] sudo yum -y install etcd kubernetes
From here, the installation will have installed all the appropriate configuration files into the /etc/kubernetes/ directory that we will need to modify.
For the file /etc/kubernetes/apiserver, ensure the following lines are uncommented and edited to match what is shown:
KUBE_API_ADDRESS="--address=0.0.0.0"
KUBE_API_PORT="--port=8080"
KUBELET_PORT="--kubelet_port=10250"
In addition, add the following line to the end of the file (where kubernetes-master is replaced by the Master instance’s local ip address e.g., 10.12.0.26 for our scenario):
KUBE_MASTER="--master=http://kubernetes-master:8080"
For the file /etc/kubernetes/controller-manager, edit the following line to reflect (where kubernetes-node is replaced by the Node instance’s local ip address e.g. 10.12.0.110 in our scenario):
KUBELET_ADDRESSES="--machines=kubernetes-node"
Now, we will go through a similar process for the Node instance. Connect to the secondary instance.
Install kubernetes using yum.
[cc@joseph-mpq055-n02] sudo yum -y install kubernetes
Due to this instance being the node, the configuration files will need to be altered in a slightly different manner than previously with the master.
For the file /etc/kubernetes/apiserver, ensure the following line is uncommented and edited to match what is shown:
KUBE_ETCD_SERVERS="--etcd_servers=http://kubernetes-master:4001"
For the file /etc/kubernetes/config, ensure the following line is uncommented and altered to match what is shown:
KUBE_MASTER="--master=http://kubernetes-master:8080"
In addition, add the following line:
KUBE_ETCD_SERVERS="--etcd_servers=http://kubernetes-master:4001"
For the file /etc/kubernetes/kubelet, ensure the following lines are uncommented and edited to match what is shown:
KUBELET_ADDRESS="-address=0.0.0.0"
KUBELET_PORT="--port=10250"
KUBELET_HOSTNAME="--hostname_override=kubernetes-node"
KUBELET_API_SERVER="--api_servers=http://kubernetes-master:8080"
For the file /etc/kubernetes/proxy, ensure the following line is uncommented and edited to match what is shown:
KUBE_PROXY_ARGS="--master=http://kubernetes-master:8080"
On the Master (the first host), we need to restart the service in order for the configuration changes to take effect. Additionally, we will enable each service so that is will start at boot for the server.
[cc@joseph-mpq055-n01] for cmd in restart enable status; do sudo systemctl $cmd etcd kube-apiserver kube-scheduler kube-controller-manager; done
The Node (the second host) will also need to restart and enable similar services.
[cc@joseph-mpq055-n02] for cmd in restart enable status; do sudo systemctl $cmd kube-proxy kubelet docker; done
Now that all the services are enabled and restarted with the new configurations, we can now begin to manipulate and deploy across the Kubernetes cluster.
Step 2: Simple Uses of Kubernetes
Now that we have the Kubernetes system in place, we can now use it to deploy applications. As mentioned before, the Master controls the entirety of Kubernetes, so each of these commands will be run on the Master host/instance that we set up previously. In our example, this would be the 10.12.0.26 machine. To start off with, we will take a look at the attached nodes using the followin command.
[cc@joseph-mpq055-n01] kubectl get nodes
NAME          LABELS                               STATUS
10.12.0.110   kubernetes.io/hostname=10.12.0.110   Ready
We can see the attached node at 10.12.0.110 showing that the Master recognizes the attached Node.
The command, kubectl (Kubernetes Control), is the primary command used to interact with Kubernetes and the attached cluster. Passing get to the command is similar to reading variables with the final argument being nodes, any and all attached nodes that are responding will be displayed the same as above. We will see this command used further in later examples.
For the next section, we will being talking about Pods. Pods are a container or group of containers that are typically meant to be run together to create a Service. There are a few main terms and concepts that need to be explained before advancing further.
To begin with, we must first go aobut defining what a Pod is in the Kubernetes environment. A pod is defined as a collection of any number of containers or applications that are to interact with one another as though they existed on the same machine. This is used in the same sense that a multi-container application would be used for within Docker alone. It is recommended that any and all applications that exist within a single pod be very tightly related to the point where it is almost a necessity that they exist on the same host. Typically, the more you can segment out a large project into separate pods the better. This is thanks to the fact that you can then scale each pod individually from each other based on their independent needs and usage to optimize resources overall.
A Service is a unique abstraction of Kubernetes that behaves in the sense of directing network traffic and flow within the cluster. Each pod is self contained and will remain so unless explicitly exposed by a service. In defining a pod, you can also define a label for the pod that Kubernetes can use to distinguish one type of pod from another. These labels are used by services in order to succesfully direct incoming and outgoing packets. Usually, services are first used internally to expose ports from one pod to another such that a project can interact between pods. Again, this can be related back to Docker in the form of linked containers. However, services in Kubernetes go far beyond the ambassador links present in Docker. To begin with, a service defines a collection of Pods, using the labels as mentioned before, and abstracts the connection between the two. This is where the SDN (Software Defined Networking) comes into play in that the pods are only required to worry about themselves and that’s it. The relation between them is handed over to the service which decides how they interact. This is one of the features that permits Kubernetes’s built-in load balancing for deployments. For example, when working with a web server, you typically embrace a frontend and backend. By splitting these two into separate pods, you can have several instances of each used to handle the load. When the frontend need a backend, it will reach out and be picked up by the service that is currently in control. The service will then select a backend that is currently unoccupied or otherwise free from the pool of available backend pods and a momentary connection will be formed.
To see our active pods, we will use this command:
[cc@joseph-mpq055-n01] kubectl get pods
POD       IP        CONTAINER(S)   IMAGE(S)   HOST      LABELS    STATUS    CREATED   MESSAGE
Since we have not yet created any pods, non are present at the execution of this command. Just to get started, we will begin by launching two instances of nginx that are guaranteed by a Replication Controller. A Replication Controller (RC) is a tool utilized by Kubernetes to ensure a specific number of pod instances are always running. It will either create or destroy more pods until it is within the specific amount provided. In addition, the RC will also be able to account for Node failure in order to migrate which host the pods are being hosted on without user intervention. The command we will use will be:
# The command is broken down into:
#  kubectl - The basic Kubernetes Control command.
#  run-container - The command used to run a container from the command line.
#  my-nginx - The name to be associated with this container, pod, rc, and other related items.
#  --image=nginx - Which Docker image to create the container from. (See Docker tutorial for more details)
#  --replicas=2 - The number of replicas the rc will ensure.
#  --port=80 - The port to expose.
[cc@joseph-mpq055-n01] kubectl run-container my-nginx --image=nginx --replicas=2 --port=80
This command will spawn two nginx pods that have port 80 open to accept incoming HTTP traffic. From here, let’s take a look back at the currently existing pods.
[cc@joseph-mpq055-n01] kubectl get pods
POD              IP        CONTAINER(S)   IMAGE(S)   HOST           LABELS                   STATUS    CREATED     MESSAGE
my-nginx-5p2n5                                       10.12.0.110/   run-container=my-nginx   Pending   6 seconds
                           my-nginx       nginx
my-nginx-valfk                                       10.12.0.110/   run-container=my-nginx   Pending   6 seconds
You can see the pods are still spawning given thei current status as Pending. Given a few more moments, the pods are now officialy in the Running state:
POD              IP        CONTAINER(S)   IMAGE(S)   HOST           LABELS                   STATUS    CREATED     MESSAGE
my-nginx-5p2n5                                       10.12.0.110/   run-container=my-nginx   Running   9 seconds
                           my-nginx       nginx
my-nginx-valfk                                       10.12.0.110/   run-container=my-nginx   Running   9 seconds
                           my-nginx       nginx
Now, it is important to remember that Kubernetes separates everything as much as it can. In that sense, even though we were only looking to run a container, pods were created for us automatically to contain the containers. In addition, since we specified that we always want two instances of nginx running, we have also indirectly created a Replication Controller that is used to monitor the pods. To see them, we run:
[cc@joseph-mpq055-n01] kubectl get rc
[cc@joseph-mpq055-n01] kubectl get rc
CONTROLLER   CONTAINER(S)   IMAGE(S)   SELECTOR                 REPLICAS
my-nginx     my-nginx       nginx      run-container=my-nginx   2
Now that we are done, we can simply destroy them.
[cc@joseph-mpq055-n01] kubectl delete rc my-nginx
Step 3: Using Setup Files With Kubernetes
In this final section, we will go about creating a series of files that can be used to define an application. For our example, we will be recreating the same tutorial released as the Docker multi-host application in the first Docker tutorial. https://github.com/cloudandbigdatalab/tutorial-cham-docker-1
First and foremost, it is very advantageous to create a directory where all the files will exist. The reason will be explained shortly. So start off with:
[cc@joseph-mpq055-n01] mkdir dock-app
[cc@joseph-mpq055-n01] cd !!*
Now that we are within our application’s directory-to-be, we will need to start defining how we want the application to be set up. Since the application has been created for us, we are going to cater to its original design. Luckily, since all the files are hosted on DockerHub, there is no need to go through the pain of recreating and compiling Dockerfiles for our case.
Each file is of the YAML file format which may often seem a little odd, but is simply broken down as another way to define nested variables in a vein similar to JSON.
Our first file will be for the main webserver and we shall call it dock-web.yaml. The contents should be:
dock-web.yaml:
apiVersion: v1beta3
kind: ReplicationController
metadata:
  name: docker-web
  labels:
    name: docker-web
spec:
  replicas: 2
  selector:
    name: docker-web
  template:
    metadata:
      labels:
        name: docker-web
    spec:
      containers:
      - name: uwsgi
        image: cloudandbigdatalab/uwsgi
      - name: nginx
        image: cloudandbigdatalab/nginx
        ports:
        - containerPort: 80
By looking at the very top of the file, we can see what exactly is being declared. The most important part of a YAML file for Kubernetes is the kind variables which defines what exactly we are creating. In this case, we can see that we are creating a Repliction Controller. Moving along, we see labels being defined in the metadata section in addition to within the spec section. spec defined the majority of the contents of the actual container, in this case, pulling the nginx and uwsgi docker containers and placing them into the same pod, exposing port 80 locally. Since in the Docker tutorial these were placed on the same host, placing them on the same pod is essentially the same. replicas is the final variable to take note of since it tells Kubernetes how many instances of the pod to run. Given that we are merely testing, we keep the number of replicas fairly small at two.
Next, we will look at the dock-post.yaml file, the file that is used to define our second pod containing a Postgres database.
dock-post.yaml:
apiVersion: v1beta3
kind: ReplicationController
metadata:
  name: docker-postgres
  labels:
    name: docker-postgres
spec:
  replicas: 2
  selector:
    name: docker-postgres
  template:
    metadata:
      labels:
        name: docker-postgres
    spec:
      containers:
      - name: postgres
        image: cloudandbigdatalab/postgres
        ports:
        - containerPort: 5432
The details of this file are virtually the same as the last since we are creating another Replication Controller to manage two instances of the pod. We are pulling the postgres image from Dockerhub and exposing 5432 locally and are now leaving them available for use.
If we were to run these two files, it would be misleading to think we are application ready since the pods are both contained and while they would exist, would not be able to communicate with one another or outside of the cluster.
To do this, we will take a look at creating Services. The first Service to take a look at will be in the file post-dock-svc.yaml, used to define the Service overlooking the Postgres pod.
post-dock-svc.yaml:
apiVersion: v1beta3
kind: Service
metadata:
  name: docker-post-svc
  labels:
    name: docker-post-svc
spec:
  ports:
  - port: 5432
    targetPort: 5432
selector:
  name: docker-post
Since the Postgres database is fairly simple in that it only need to connect internally to other hosts within the cluster, we can rather easily see what is being done. First, the kind has now been changed to Service, though the labels still remain. The spec section now contains port and targetPort. The reason for having two port variables is that targetPort defines which port on the pod it should look for in terms of making a connection while port defines the port Service will expose and route the traffic through. This permits users to have multiple pods locally expose the same port (e.g. 80), but then have each of them being served on different ports within the cluster to differentiate between them. Just as important is the selector structure defined. This tells the Service what it should be targeting. By providing the name of the label defined in the Replication Controller in dock-post.yaml, the Service knows where to direct traffic.
Finally, the more complex service file is web-dock-svc.yaml. The complexity exists solely because of the desire to expose out of the cluster and through the Node.
web-dock-svc.yaml:
apiVersion: v1beta3
kind: Service
metadata:
  name: docker-web-svc
  labels:
    name: docker-web-svc
spec:
  selector:
    name: docker-web
  type: NodePort
  ports:
  - port: 80
    targetPort: 80
    nodePort: 30080
    protocol: TCP
Similar to the previous Service defined, this starts out the same, but within spec, we see a type defined. type is assigned the value of NodePort which means that the Service will expose the traffic designated on a port of the actual Node host where it ends up being hosted. More definitions in ports shows a nodePort that tells the Service which port traffic should be routed to and from. This is the first and only external connection made within the web application, meaning that everything but this one port is contained within the virtual cluster. Typically, there is no need to define a nodePort explicitly as it will automatically assign one within the range of Node Ports defined in the configuration files. In our case, especially for testing, a static port is comfortable to rely on.
Now, the reason for placing all of the files into a single directory is to take advantage of the create and delete command we can pass to Kubernetes. Instead of bringing up and tearing down structures one at a time, we can do it all at once to greatly speedup deployment and testing. To create our application, we simply run the command:
[cc@joseph-mpq055-n01] kubectl create -f <filename / dirname>
Since we are currently in the directory with all the files, we can use:
[cc@joseph-mpq055-n01] kubectl create -f .
replicationcontrollers/docker-postgres
replicationcontrollers/docker-web
services/docker-post-svc
services/docker-web-svc
And voila, we now have an active application. While the setup is daunting, the ease of deployment and management is what makes Kubernetes worthwhile. Coupled with the load balancing and resiliance, it is hard to beat. Want to tear down your app? Run:
[cc@joseph-mpq055-n01] kubectl delete -f .
replicationcontrollers/docker-postgres
replicationcontrollers/docker-web
services/docker-post-svc
services/docker-web-svc